Visit our active Mushroom Urban Farm (athens, Greece) on wordpress :
https://themushroomcircle.wordpress.com/
and facebook :
https://www.facebook.com/themushroomcircle/
for photos, contact, products, and more information
7.8.2016
Cultivate food without land… impossible you say ? Look at this post and think “Mushrooms !”. When we found ourselves with no garden, no soil neither sun, the idea came of growing mushrooms indoors in our living room and kitchen, and recycle many waste, such as coffee ground or cardboard. Results are really impressive!
What is the importance and benefits of mushrooms ?
Mushrooms are magic living organisms and need very few things to grow. They are also delicious, have many medicinal benefits, and growing them is the best way to get them fresh. They are also very precious for all ecosystems, as recyclers for wood and organic material. They are the only organisms that can digest the tough and fibrous lignin in wood, and make it available for other organisms. Mushroom cultivation spent substrate is very nutritive and improve soil structure. Mushrooms are also great recyclers and healers of modern society. They can grow on waste, such as coffee ground or cardboard, and have strong soil remediation properties, such as decontaminating petroleum pollution.
V-
How to grow mushrooms from spawn ?
Most people ignore how easy growing gourmet mushrooms can be. Best way to start is from mushroom mycelium spawn, that you simply place in bags filled with sterilized substrate (e.g. woodchips, straw). After one or two months, the bag becomes entirely white and you can harvest delicious mushroom caps that start to grow. This post explain this simple method to produce mushrooms from mycelium spawn. Following posts will cover more advanced technique to produce this mycelium spawn from spores. Details on mushroom cultivation can be found on our wiki : mushroomway.wikispaces.com.
Step 1: Preparation
First, you choose a mushroom species and a substrate for cultivation. Gourmet mushrooms can be classified in two categories, wood lovers and compost lovers. Wood lovers are easiest for indoors, include Oysters or Shitake, and grow on wood or straw based material, including cardboard and coffee ground. Compost lovers are hardest for indoors, and include white button mushroom. They grow on wood or straw based material, alone or mixed with compost, but need compost to make caps (that can be applied at the end as a top layer called casing). Of course, you should start with wood lover species, unless you like challenges.
Second, you find a mushroom spawn and a substrate. To buy spawn, you can easily find shops near to your area, by googling “mushroom spawn yourcountry”. In Europe, we bought from shii-take.de in Germany, and mrcashop.org in Austria, both very professional. Wheat straw (the thickest 0.5cm) or woodchips and woodsaw can be found at supermarkets, animal shops, and many other sources. Coffee ground waste is also used in cultivation, and can be freely taken at many coffee shops.
Third, you sterilize the substrate. Mushrooms need sterile condition for their growth. In the next steps we explain two different methods, a first easy way with less sterilization, and a second more sterile culture method with better result, but require oven bags and a pressure cooker.
- I – First easy method works only with wood and straw, and consist in soaking substrate in hot water. Put the substrate in a large plastic box, fill it with hot water, monitor the temperature to stay at 65C, and cover with a lit for 90min.
- II – The second more sterilized method works for any substrate, including coffee ground and compost. It consists in pressure cooking the substrate in an oven bag. Fill only half of an oven bag with substrate and add water (150% of dry substrate weight). Coffee ground waste is often already wet, then you can add less water (80% of wet coffee ground). Put the bag(s) in a pressure cooker for 60min, being careful to leave the bag opening near pressure cooker valve – and avoid bag inflation when heated.
Step 2: Inoculation
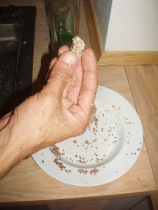
Inoculation consist in placing spawn in sterile substrate that will be colonized. Choose a clean table. Wash your hands and clean the table with an antiseptic (alcohol 70%), before starting. Open spawn bag, cut a piece with a clean spoon (at least 10% of substrate weight), and break it intro small pieces 2-4 cm (see photo).
- I – With the easy method, remove the water from substrate and transfer it to plastic bags (8L to 20L). Add the mycelium while you are filling the bags (after each few cm layer). Make regular holes with a toothpick at 3 to 5 cm. The substrate must stay humid and breath from the holes.
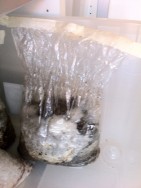
- II – With sterile method, dig a hole in the substrate and try to place the spawn as much regularly as possible. Close the bag while leaving maximum of air possible and close it hermetically with a tape or a hot iron. Mix the content of the bag to distribute the spawn. The air bubble in the bag is a miniature atmosphere safe for the mushroom.
When your bags are ready, label them with mushroom name and the date, and place them in plastic boxes with no lid, or hanging in a cupboard in your kitchen or living room.
Step 3: Waiting
Hardest thing in mushroom cultivation is patience. You need to wait between 3 weeks and 3 months that the mycelium of the mushroom colonize the substrate. Day by day, you see it making fuzzy cotton ball that grows. In the easy method, humidity must be monitored and maintained during this period. After a while the mycelium reaches full colonization, and the substrate is totally covered with a thick white cover. Afterward, the mycelium often seems regressing and small pins start to grow at the surface. If you want to trigger pin formation, you can put the mycelium bag (inside a protective tight bag) in a fridge for 24h and spray water on the surface of myclium.
Step 4: Harvest
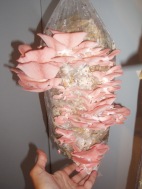
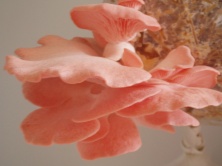
Pink oyster caps growing out of hanged straw bags.
When caps start to grow you can transform your setup. Place the bags in large plastic boxes leaving at least 50% free space. Make a large hole (25% of lid surface) in the lid and cover the hole with a breathing material (e.g. coffee filter). If you can, add 2 cm of wet sterilized perlite at the bottom of the boxes to keep them moist. In the sterile method, open the bags and leave them open. With compost lovers, you need to additionally cover the substrate with a thick layer of sterilized compost and peat moss.
Mushroom caps often grow in several harvest. The caps grow in 2 days to 2 weeks.The pin appears on the mycelium, grow rapidly, then the cap opens. When the cap is almost horizontal, is mature, and for most of mushrooms its better for taste and conservation to harvest them just before. In a next episode, we will post how to make a spore print from your harvest.
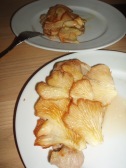
Simmered pink oyster
Step 5 : Cooking
Most mushrooms can be eaten fresh, grilled or simmered. In our opinion simmering is the best option, allowing to develop mushroom flavor. Homegrown mushrooms does not need to be washed. For oyster mushroom washing even spoil their taste. Mushroom caps can be conserved one or two weeks in a fridge and more by freezing or, better, drying.
Mushroom species
We started with Pleurotus Djamor, Shitake and Macrolepiota in straw, woodchips, dried grass-clips, coffee ground and paper substrate. Most of our substrate and species were successful but we have also learned a lot from our mistakes.Pink oyster were very quick to produce, just after weeks, while shiitake was slower, two or three months, but produced caps on a long duration, more than 6 months. As explained earlier, difference between mushroom species is the substrate, but also the timeframe and preferred temperatures.
Pink Oyster, Pleurotus djamor, is an easy and ultra fast to grow wood lover species, that prefer hot temperatures (25-35C). Pink Oyster is very strong and its cultivation need only little sterilization. It prefers straw and similar material. After three weeks, the substrate is colonized and you start getting caps. The pink color of the caps is amazing, and slowly turn to white as the cap matures. Pink Oyster make abundant harvest in packets (see photo), with two or three harvest with time interval of one to two weeks. When cooked, the pink color turn to a yellow color (see photo). Pink Oyster taste is a mild and pleasant typical oyster taste. It is better simmered. Pink Oyster convervation is not very good, must be eaten or dried in few days.
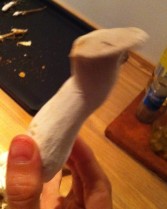
King Oyster, Pleurotus eryngii, is a quite easy and not very fast wood lover species to grow, that prefer cold temperatures (12-25C). King Oyster is quite sensitive and need a good sterilization level. It prefers woodchips and similar material. After one month, the substrate is colonized, but it may take one or two more weeks to start making caps. Caps are generally big and grow in group, with a thick stem. Unlike other oyster caps, the stem is even better tasted than the cap. King Oyster, deserves his name, and is certainly the most gourmet of gourmet and oyster mushroom, with a delicate and subtle taste. It can be eaten fresh, but it is almost tasteless, but after simmering, its captivating flavor and fragrance develop, and can be best appreciated in a delicate combination with herbs. Conservation of King Oyster is really excellent, and its shellfire can be weeks in the fridge, even though it is better fresh.
Shiitake, Lentinula edodes, is a very easy but very slow wood lover species to grow, that like mild temperatures (15-28C). It prefers woodchips and straw mix substrate, but prefers woodchips than straw alone. Shiitake is very slow, and take two months to fully colonize the substrate and need one month of resting, called browning, during the while mycelium color changes to brown and form a think skin. Caps grow per two or three by 8L bag, every two months during ten months. Several bag often relay each other, when one stops, another start growing, making shiitake mushroom almost always available for consumption during cultivation. The cap reaches maturity when it is almost horizontal, but must be picked earlier. Unlike oysters, shiitake caps have a normal mushroom shape, and can be easily recognized from their brown/black flat disc on top of the cap. The taste of Shiitake is very seducing, but is long to cook. Best in soup or simmered for 15 min. Shiitake has a long shelflife and can be kept two or three weeks in the fridge. In our experience, the problem with mushroom is to keep the substrate moist on the long run.
Parasol mushroom, Macrolepiota procera, is a hard and slow compost lover species to grow, and like cold temperatures (12-25C). The cultivation of this species is not well known and documented, and is believed to be very near to shaggy mane cultivation. Parasol mushroom prefers straw with compost, but can grow on straw alone, and more hardly on woodchips alone. The mycelium is long to colonize the substrate, after 2 months. To make caps, Parasol mycelium needs a casing layer with compost to be able to make fruit, which make more suited for cultivating in an outdoor bed (will be described in a next post) rather than for indoors. Parasol mushroom is very interesting, but challenging, to cultivate. It is one of the finest gourmet mushrooms, and is hard to find in nature where it can be easily confused with poisonous species. We did not get yet caps from this mushroom, we freshly made an outside bed, and we’ll post about that soon.
Troubleshooting
You may encounter some problems during cultivation. We will try to indicate how to solve the most common problems here, but you can find plenty of documentation in several websites, including our wiki (mushroomway.wikispaces.com) and shroomery forum.
Dry or strange caps : Sometimes caps doesn’t grow, take a strange shape or dryout, then need to be removed, and occur when no more nutrition or water is left in the substrate. You can add water if the substrate is dry, if not it means the substrate is finished or has been contaminated by another invisible organism (bacteria, other fungi).
Partial colonization: Sometimes, the mycelium stops growing before convering all the substrate. In that case, it means that this bag has been contaminated, and better be tossed. If you want to keep it, you need to isolate it from the others.
Mold (green, black, pink, etc): Sometimes, another thing start growing in the substrate, such as green mold. Molds are also fungi and are not very different from mushrooms, and play important role in soil enrichment and plant roots protection. But they do not produce fruits, only spores (green, blue, pink, etc). The bag with mold need to be tossed the earliest possible to avoid contamination to other bags.
Fungus Flies: Sometimes, you may find a fungus fly looking for your mushroom bag. Fungus flies are attracted to mushrooms, and their elimination need to be taken very seriously. The bags need to be isolated, e.g. in plastic boxes with breathing lid, until you find and eliminate the source of fungus flies, which usually are stagnant water, over watered plant pots, compost bin, etc. In outdoor environment, fungus flies are not really a problem as their predator mites and parasite nematodes can balance their population.
Finance
For only one species, with no mistakes, you may spend 20-25 euro (e.g. 15 for spawn, 10 for substrate) to get 3 to 4 kilo of mushrooms, which is cheaper than wholesale price. We spent about 90 euros for 3 species and we got about 2kg of oyster and 2kg of shiitake, with many tries, errors, joys, dishes and lessons learnt. This price it is still too expensive (25euro per kilo), compared to market price (10 per kilo ), but a bit cheaper than supermarket price (30euro per kilo) with much fresher and original product. On the long run, the cost depends mainly on how expensive is the spawn, as wood chips or coffee ground can be found for almost free in certain places. In that case you may be interested in going further and produce you own spawn, as will be described in a next post.

Pingback: Garden Culture Magazine » Growing Mushrooms At Home » Garden Culture Magazine
interesting mushroom cultivation page, thanks for the link
Pingback: Medicinal Mushrooms Michigan | Aloha Medicinals Reishi
Pingback: Cordyceps Sp. FB13 Mushroom | Mushroom Spawn Shop
Pingback: Growing Mushrooms At Home - Garden Culture Magazine